|
|
 發表於 2009-9-28 21:59:39
|
顯示全部樓層
發表於 2009-9-28 21:59:39
|
顯示全部樓層
Bollo播樂隨身高清播放機初測試!
<P>轉貼自<A href="http://www.myav.com.tw/bbs/showthread.php?s=&threadid=398533&highlight=%BC%BD%BC%D6">http://www.myav.com.tw/bbs/showthread.php?s=&threadid=398533&highlight=%BC%BD%BC%D6</A></P>
<P><FONT style="BACKGROUND-COLOR: #dcdfe1"></FONT> </P>
<P>一直都是用HTPC在跑高解析度的影片,在電腦上跑的很累,電腦累,我也累!</P>
<P>剛好朋友有一直在玩劇院的東西,一個月前有跟我透露會進一台”掌上”型的高清播放機。</P>
<P>這幾天已經拿到了,借來試一試,因為是第一次接觸高清機,只能說先簡單介紹!</P>
<P>我不敢講開箱,因為好像已經有人先在友站貼開箱文了。</P>
<P>不管,先把這台”小”機器介紹一下。</P>
<P>Bollo 播樂 nmp-mob 第一台內建2.5”SATA硬碟高清播放機<BR><IMG onmousewheel="return imgzoom(this)" onmouseover="attachimg(this, 'mouseover')" onclick="attachimg(this, 'click', 'http://farm3.static.flickr.com/2526/3921435861_b73123b237.jpg')" alt="" src="http://farm3.static.flickr.com/2526/3921435861_b73123b237.jpg" onload="attachimg(this, 'load', 'Click here to open new window\nCTRL+Mouse wheel to zoom in/out')" border=0> </P>
<P>就像是個隨身包,一般筆記本的大小。</P>
<P>打開以後所有的配件都有固定的隔間及位置。<BR><IMG onmousewheel="return imgzoom(this)" onmouseover="attachimg(this, 'mouseover')" onclick="attachimg(this, 'click', 'http://farm3.static.flickr.com/2433/3921434729_8a500b3c36.jpg')" alt="" src="http://farm3.static.flickr.com/2433/3921434729_8a500b3c36.jpg" onload="attachimg(this, 'load', 'Click here to open new window\nCTRL+Mouse wheel to zoom in/out')" border=0> </P>
<P>把所有的東西排列出來,包含主機、遙控器、中文簡體說明書、保證卡、USB連接線、色差線、AV複合訊號線、電源線、100~240V變壓器、小十字起子。<BR><IMG onmousewheel="return imgzoom(this)" onmouseover="attachimg(this, 'mouseover')" onclick="attachimg(this, 'click', 'http://farm4.static.flickr.com/3439/3921437865_019176af74.jpg')" alt="" src="http://farm4.static.flickr.com/3439/3921437865_019176af74.jpg" onload="attachimg(this, 'load', 'Click here to open new window\nCTRL+Mouse wheel to zoom in/out')" border=0> </P>
<P>主機的正面,從右邊開始 紅外線遙控接收、USB slave(把主機當隨身碟用時)、電源燈、硬碟讀取燈。</P>
<P>左邊可以看到它直接標識著 Sigma Design的8635LF inside</P>
<P><IMG onmousewheel="return imgzoom(this)" onmouseover="attachimg(this, 'mouseover')" onclick="attachimg(this, 'click', 'http://farm3.static.flickr.com/2581/3922216586_c13e3d54a9.jpg')" alt="" src="http://farm3.static.flickr.com/2581/3922216586_c13e3d54a9.jpg" onload="attachimg(this, 'load', 'Click here to open new window\nCTRL+Mouse wheel to zoom in/out')" border=0> </P>
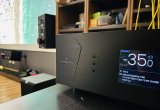
<P>主機上方右上角 "移動高清 Full HD 1080P"</P>
<P><IMG onmousewheel="return imgzoom(this)" onmouseover="attachimg(this, 'mouseover')" onclick="attachimg(this, 'click', 'http://farm3.static.flickr.com/2429/3922220066_79f9c745a2.jpg')" alt="" src="http://farm3.static.flickr.com/2429/3922220066_79f9c745a2.jpg" onload="attachimg(this, 'load', 'Click here to open new window\nCTRL+Mouse wheel to zoom in/out')" border=0> </P>
<P>主機上面已經有直接的功能鍵 "上下左右及Enter鍵" "停止、Root(像是Home)、TV mode"</P>
<P><IMG onmousewheel="return imgzoom(this)" onmouseover="attachimg(this, 'mouseover')" onclick="attachimg(this, 'click', 'http://farm3.static.flickr.com/2626/3922227024_8a3435483e.jpg')" alt="" src="http://farm3.static.flickr.com/2626/3922227024_8a3435483e.jpg" onload="attachimg(this, 'load', 'Click here to open new window\nCTRL+Mouse wheel to zoom in/out')" border=0> </P>
<P>主機的背板 從右到左分別是 SPDIF光纖輸出、色差輸出端子、複合訊號及立體聲輸出、HDMI 1.3輸出、USB Host端子,該有的都有了。</P>
<P><IMG onmousewheel="return imgzoom(this)" onmouseover="attachimg(this, 'mouseover')" onclick="attachimg(this, 'click', 'http://farm3.static.flickr.com/2647/3921442421_aeea3df88e.jpg')" alt="" src="http://farm3.static.flickr.com/2647/3921442421_aeea3df88e.jpg" onload="attachimg(this, 'load', 'Click here to open new window\nCTRL+Mouse wheel to zoom in/out')" border=0> </P>
<P>主機全身照,右下可以看到DC的電源輸入。<BR><IMG onmousewheel="return imgzoom(this)" onmouseover="attachimg(this, 'mouseover')" onclick="attachimg(this, 'click', 'http://farm4.static.flickr.com/3505/3922222042_9b7f7de886.jpg')" alt="" src="http://farm4.static.flickr.com/3505/3922222042_9b7f7de886.jpg" onload="attachimg(this, 'load', 'Click here to open new window\nCTRL+Mouse wheel to zoom in/out')" border=0> </P>
<P>主機底下的散熱孔,散熱的總表面積似乎是蠻大的,小機器又內建硬碟,本來是會比較擔心散熱夠不夠!</P>
<P><IMG onmousewheel="return imgzoom(this)" onmouseover="attachimg(this, 'mouseover')" onclick="attachimg(this, 'click', 'http://farm3.static.flickr.com/2615/3921439631_2b9ba50071.jpg')" alt="" src="http://farm3.static.flickr.com/2615/3921439631_2b9ba50071.jpg" onload="attachimg(this, 'load', 'Click here to open new window\nCTRL+Mouse wheel to zoom in/out')" border=0> </P>
<P>拿在手上看看!</P>
<P><IMG onmousewheel="return imgzoom(this)" onmouseover="attachimg(this, 'mouseover')" onclick="attachimg(this, 'click', 'http://farm3.static.flickr.com/2486/3921444731_5398ff1b99.jpg')" alt="" src="http://farm3.static.flickr.com/2486/3921444731_5398ff1b99.jpg" onload="attachimg(this, 'load', 'Click here to open new window\nCTRL+Mouse wheel to zoom in/out')" border=0> </P>
<P>開始來裝硬碟了,利用它隨附的起子卸下週圍四顆小螺絲,小心不要掉了!</P>
<P><IMG onmousewheel="return imgzoom(this)" onmouseover="attachimg(this, 'mouseover')" onclick="attachimg(this, 'click', 'http://farm3.static.flickr.com/2536/3922224826_99c5e1d0af.jpg')" alt="" src="http://farm3.static.flickr.com/2536/3922224826_99c5e1d0af.jpg" onload="attachimg(this, 'load', 'Click here to open new window\nCTRL+Mouse wheel to zoom in/out')" border=0> </P>
<P>打開上蓋,主電路板上面有一片透明塑膠片,應該為了與硬碟絕緣的用途吧!還有內接Sata的接頭,以及兩顆銅樁,不用上螺絲可以作為硬碟固定的卡筍。</P>
<P><IMG onmousewheel="return imgzoom(this)" onmouseover="attachimg(this, 'mouseover')" onclick="attachimg(this, 'click', 'http://farm3.static.flickr.com/2464/3922230008_3c321f906e.jpg')" alt="" src="http://farm3.static.flickr.com/2464/3922230008_3c321f906e.jpg" onload="attachimg(this, 'load', 'Click here to open new window\nCTRL+Mouse wheel to zoom in/out')" border=0> </P>
<P>呵呵!7,200轉Seagate 500GB 硬碟上身。<BR><IMG onmousewheel="return imgzoom(this)" onmouseover="attachimg(this, 'mouseover')" onclick="attachimg(this, 'click', 'http://farm4.static.flickr.com/3527/3921449161_51a54f6e4e.jpg')" alt="" src="http://farm4.static.flickr.com/3527/3921449161_51a54f6e4e.jpg" onload="attachimg(this, 'load', 'Click here to open new window\nCTRL+Mouse wheel to zoom in/out')" border=0> </P>
<P>接下來是接上電視來試,因為它是一台小型的隨身播放機,所以在連接端子必須要考量佔用最小的空間,這是它附的AV(複合)訊號線。<BR><IMG onmousewheel="return imgzoom(this)" onmouseover="attachimg(this, 'mouseover')" onclick="attachimg(this, 'click', 'http://farm3.static.flickr.com/2615/3922233682_09c6d74a5d.jpg')" alt="" src="http://farm3.static.flickr.com/2615/3922233682_09c6d74a5d.jpg" onload="attachimg(this, 'load', 'Click here to open new window\nCTRL+Mouse wheel to zoom in/out')" border=0> </P>
<P>以及色差線<BR><IMG onmousewheel="return imgzoom(this)" onmouseover="attachimg(this, 'mouseover')" onclick="attachimg(this, 'click', 'http://farm4.static.flickr.com/3459/3921448017_78e66b947f.jpg')" alt="" src="http://farm4.static.flickr.com/3459/3921448017_78e66b947f.jpg" onload="attachimg(this, 'load', 'Click here to open new window\nCTRL+Mouse wheel to zoom in/out')" border=0> </P>
<P>不過既然是高清機,我當然是用HDMI線來測試,不過在這之前,我是用它附的USB連接線,連到電腦當成隨身硬碟來格式,同時Copy檔案,會佔用兩個USB,因為有輔助電力的問題,它支援FAT32、NTFS,所以就用NTFS囉。 </P> |
|


 狗仔卡
狗仔卡
 樓主
樓主 ,漂亮.
,漂亮. 
 發表於 2009-9-14 23:07:10